Editor Table Options
This is the basic table from the File/New option.
Click on the table and
![]() Select
options. Doing this brings up the Table Options
Select
options. Doing this brings up the Table Options
|
Table Options |
you would click on the table & have the
options selected from the toolbar for Table Options.
|
|
Tip 64x64 Pixels is a good size for creating Balls in a paint program.& export as.bmp not .jpg
|
---- Editor Table - The name of the object you have selected, which would be the table. Name - Table1 The name of the table, you can change this to whatever you want. Its ok to leave this as the name. Since this is the only table you'll be able to have in the template.Saving the table to a file doesn't change this. Show Grid - It already will have a checkmark in it as default. Unchecking it will take away the horizontal & vertical lines. These are useful to have on when you need to line up object on the table. Grid Size - Already set to 50, to make it farther apart, you enter a bigger number, & a smaller number to make the grid into smaller squares. You may need to change these later to get more detailed with the objects. Display Image in Editor - If you have a table image imported, you would be able to see it. Note: If your editor seems to be running slow, you can uncheck this box so Images don't show in the editor. That should help speed things up a little. ----- Colors & Formatting Color - Clicking this opens the Color Box, from there you can select the color of your table. Image - Since table is selected, this would be your table image, after it's imported you would select it from the scroll down list.Note:Table images are usually 512 x 1024 Pixels. Note: Maximal size is 1024x1024 pixel Render Shadow Affiche les ombres sur la table. Checked by default ------Physics Width - Changes the Width of your table. 1000 is the default size. Height - Changes the height of your table. 2000 is the default size. Glass Height - The height of the glass, real pinball machines have glass and so does this 1. If you make an object(wall, Ramp ect.) Higher then the glass, your ball will get stuck. 210 is Default. AlsoNote:The ball in VP is 50 units, So maximum heights of objects should be 50 Less then the 210 Table Slope - This changes the steepness or incline of the table, Default is 6. ------Ball Ball Image - You need to Import an image for the ball, if you want to use one. Default is just a plain ball but you can use the image supplied here. To use it you need to select it in the scroll down in Ball Image. Note:To use the ball image on your table just select it in the Ball Image drop down, It's that easy!. You used to have to add it in the script by adding Plunger.CreateBall.image = "ballimage8" in the script. "I used Plunger because thats in a new basic table script." But kickers can also create balls. You can still change the image or ball color in the table in script as needed. Front Decal You can add a decal on the front side of the ball.
Same pocedure than applying a ball image. Back Decal You can add a decal on the back side of the ball.
Same pocedure than applying a ball image. Note: You can apply all three options.(Ball
Image ,Front Decal,Back Decal ) in the editor Note: The image is not like a texture used
in a 3D program but a sprite moved on the table. |
Changing Ball Colors RGB
|
To apply an imageto a ball 1)Select ..Table/Image Manager... |
|
|
2)Click on Transparency..
Note:A new table won't have any Images in the Image Manager.Just Ignore the Images & worry about Transparency, Button In the Picture. |
|
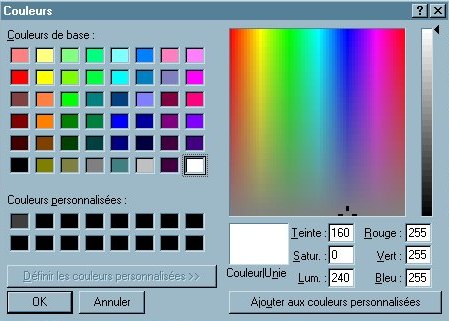
CreateBall.color=rgb(64,0,128) would give you a dark blue ball. The color right above the white. |
3)Click on a color in Basic Colors. Note the Red:255 Green:255 Blue:255 These are the rgb colors. Clicking on another Basic color changes the rgb colors. Use the rgb numbers to change the Ball Color. |
Change the RGB color of the ball in the scriptYou can also Change the color of the basic ball from within the script. To get additional RGB Colors for Ball.Color you could use the Program Paint(Color/Edit Colors... Click on define custom colors)usually comes with windows or follow these steps. |
Note: This is where the visual aspekt is defined.
 |
|
 |
-----Editor Show Grid - displaying the grid Grid size - can change the size of the grid Display Image in Editor - displaying the backdrop image -----Colors & Formatting Color - Clicking this opens the Color Box, from there you can select the color of your backdrop. Image - Since table is selected, this would be your table
image, after it's imported you would select it from the scroll down
list. For the bakdrop usual size is 800x600 Pixel . Inclination -Visual Inclinaison of the table (do not affect the slope) Field of View (FOV) - Wide angle to teleobjectiv vue of the table |
Editor - Learn the Basics of the Visual Pinball Editor. Menu Bar Functions - Importing Images & Sounds.
Table Options - Ball Color - This explains Table options, importing a ball image & Changing ball color.
Right Click Options - Explains All Right Clicking Options for All Objects.
Building a simple Sling Shot - Learn how to make a slingshot from scratch using a basic wall.
Decals - Explains Decal Options, & shows how to import an image for a decal. Pinball DemoDecal
Plungers & Kickers - How to use a Plungers & Kickers & a Simple Pinball Demo
Walls & Targets - Explains Walls & Targets. Pinball Demo1
Lights Collections - Learn how to use lights in a collection using collection manager. Pinball DemoLights
Lights & Bumpers - Learning Light & Bumper States & Lights, Bumpers Option Bar. Pinball Demo2
Gate & Sound Events - Explains Gate options & how to use sound events in keyup & keydown. Pinball Demo2
TextBox & Making Score count - Shows you how to use TextBoxes & AddScore & Dim Score. Pinball Demo3
Ramps - Explains Ramp Options & shows you how to build a simple Ramp. Pinball Demo4
Spinners - Explains Spinner Options & shows script to make a spinner work. Pinball Demo4
Triggers - Explains Trigger Options & shows script to make a Trigger work. Pinball Demo5
Timers - Explains Timer Options & shows script to make a Timer work. Pinball Demo6
Flippers - Explains Flipper Options & shows script to make a Flipper work. Pinball Demo7
EMReel - Shows you how to use EMReels. Pinball Demo8

 64x64 Pixels