The Tool
Bar
The Tool
Bar
The Tool
Bar
Gate
Gate are used to make ball travel 1 directional after passing them, & can be placed anywhere on table as longs as the ball can travel through them.
![]()
Gate Button
 |
|
|
|
| First Lets Create a Gate:If you don't have a table already opened File / New to open a new Table. | Click on the Gate button | Move Cursor towards the table you are building it should turn into a Gate cursor, click this where you would like your Gate placed. | and you get a Gate. |
Now that we have a Gate Created we can look at the Gate Option Properties.
|
|
|
| Click on options in the ToolBar | and select the Gate by clicking on it.. |
Doing this will show us the Gate properties.
|
|
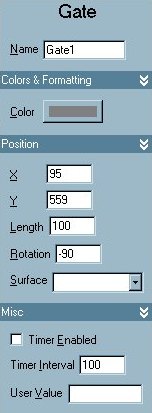
Gate - Name for type of object you have selected. Name - Gate1 The name of the Gate, you can change this to whatever you want. Tip I usually Keep Gate names. The name is used to address the object through the script. Color - Select the color of the Gate. X - Indicates the X position of the Gate on table. Y - Indicates the Y position of the Gate on table Length- 100 is Default. Here you can Increase(100+)or Decrease(Smaller number)the Gate Length. Rotation - -90 is Default. Changing this changes the angle of the Gate. Surface - In this scroll down box, you select which surface to place the Gate on<None> is Default. Which is Actually the table itself. Surfaces could be another wall or ramp, other surfaces are usually higher than the Table. ------ Misc Timer Enabled - Unchecked is default. The Timer is off. He can be activated in the script and called by the procedure EMReelName_Timer() Timer Interval - Is the Time before the Timer procedure start. UserValue - This Variable is userdefined and can be use for wathever you want. I use it often as event flag in the script. |
Using demo2light&bumperstates.zip
|
Here is some basic script for adding sounds to events. Script is Green so you know it's script. 'Gate_Hit sub will turn on the gatelight when hit Sub Gate_Hit() ' what happens when the gate
is hit is inside the sub Notice the PlaySound in the PlungerKey .PullBack & .Fire Sub Table1_KeyDown(ByVal keycode) If keycode = PlungerKey Then Sub Table1_KeyUp(ByVal keycode) If keycode = PlungerKey Then |
Editor - Learn the Basics of the Visual Pinball Editor. Menu Bar Functions - Importing Images & Sounds.
Table Options - Ball Color - This explains Table options, importing a ball image & Changing ball color.
Right Click Options - Explains All Right Clicking Options for All Objects.
Building a simple Sling Shot - Learn how to make a slingshot from scratch using a basic wall.
Decals - Explains Decal Options, & shows how to import an image for a decal. Pinball DemoDecal
Plungers & Kickers - How to use a Plungers & Kickers & a Simple Pinaball Demo.
Walls & Targets - Explains Walls & Targets. Pinball Demo1
Lights Collections - Learn how to use lights in a collection using collection manager. Pinball DemoLights
Lights & Bumpers - Learning Light & Bumper States & Lights, Bumpers Option Bar. Pinball Demo2
Gate & Sound Events - Explains Gate options & how to use sound events in keyup & keydown. Pinball Demo2
TextBox & Making Score count - Shows you how to use TextBoxes & AddScore & Dim Score. Pinball Demo3.
Ramps - Explains Ramp Options & shows you how to build a simple Ramp. Pinball Demo4
Spinners - Explains Spinner Options & shows script to make a spinner work. Pinball Demo4
Triggers - Explains Trigger Options & shows script to make a Trigger work. Pinball Demo5
Timers - Explains Timer Options & shows script to make a Timer work. Pinball Demo6
Flippers - Explains Flipper Options & shows script to make a Flipper work. Pinball Demo7
EMReel - Shows you how to use EMReels. Pinball Demo8