The Tool
Bar
The Tool
Bar
Editor Objects
Plunger & Kicker
The Tool
Bar
Plunger
The Plungers is used to launch the ball onto the table usuaully using the enter key.
![]()
Plunger Button
| Note:The next step is to show how to create a plunger but can be skipped & use the plunger thats already on the new table. For a plunger to work correctly it needs walls around it to hold the ball in place or the ball would fall off. |
 |
|
|
|
|
First Lets Create a Plunger:If you don't have a table already opened File / New to open a new Table. |
Click on the Plunger button | Move Cursor towards the table you are building it should turn into a Plunger cursor, click this where you would like your Plunger placed. | and you get a plunger. |
Now that we have a Plunger Created we can look at the Plunger Option Properties.
|
|
|
| Click on options in the ToolBar | and select the Plunger by clicking on it. |
Doing this will show us the Plunger properties.
|
|
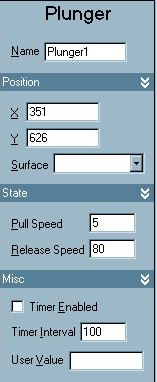
Plunger - Name for type of object you have selected. Name - Plunger The name of the Plunger, you can change this to whatever you want. Tip Keep that name because it is already in the script, if you change the name you'll need to change it in the script also. The name is used to address the object through the script. X - Indicates the X positon of the Plunger on table. Y - Indicates the Y positon of the Plunger on table Surface - In this scroll down box, you select which surface to place the Plunger on<None> is Default. Which is Actually the table itself. Remeber: A Plunger needs walls to keep the ball in place. Pull Speed - The speed of the plunger being pulled. Release Speed - The speed of the plunger when it is released (Launches Ball) Timer Enabled - Unchecked is default. The Timer is off. He can be activated in the script and called by the procedure PlungerName_Timer() Timer Interval - If enabled will call PlungerName_Timer() in the script .Unchecked is default.This option defines the time befor the procecedure is started 1000=1 second. UserValue - This Variable is userdefined and can be use for wathever you want. I use it often as event flag in the script. Note: This variable do not need a Dim
declaration . type could be (string,boolean,numeric) |
|
The Script That works A Plunger.Note: This is Just showing you the basic Script for a Plunger, you could add a Playsound"squeekylunger" for pullback & Playsound"balllaunch" for the fire, to give it some realistic Pinball sounds. Also this is just part of the keycodes Sub, you always need to end a sub with End Sub. Sub Table1_KeyDown(ByVal keycode) If keycode = PlungerKey Then Sub Table1_KeyUp(ByVal keycode) If keycode = PlungerKey Then |
Kicker
The Kickers can be used to launch the ball onto the table.
![]()
Kicker Button
|
|
|
|
| First Lets Create a Kicker:If you don't have a table already opened File / New to open a new Table. | Click on the Kicker button | Move Cursor towards the table you are building it should turn into a Kicker cursor, click this where you would like your Kicker placed. | and you get a Kicker. |
Now that we have a Kicker Created we can look at the Kicker Option Properties.
|
|
|
| Click on options in the ToolBar | and select the Kicker by clicking on it. |
Doing this will show us the Kicker properties.
|
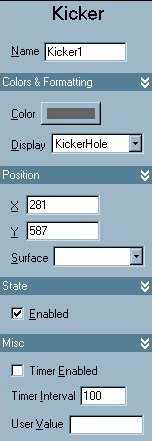
KickerHole,KickerCup KickerHidden- Doesn't Show up on table, but is there. |
Kicker - Name for type of object you have selected. Name - kicker1 The name of the Kicker, you can change this to whatever you want. Tip I Usually keep the name, & only rename it if I have a bunch of kickers or it's being used as part of something. The name is used to address the object through the script. Color - Opens the color pop up window, so you can change the color of it. Display - Scrolldown Has 3 options, KickerHole(Default)KickerCup & KickerHidden X - Indicates the X positon of the Kicker on table. Y - Indicates the Y positon of the Kicker on table. Surface - In this scroll down box, you select which surface to place the Kicker on<None> is Default. Which is Actually the table itself. Enabled - Have this checked to enable the kicker to work. Timer Enabled - Unchecked is default. The Timer is off. He can be activated in the script and called by the procedure. Timer Interval - After some script, this works with the Kicker. If enabled will call KickerName_Timer() in the script .Unchecked is default. See. demo0kickertimer.zip for a demo of this function. UserValue - This Variable is userdefined and can be use for wathever you want. I use it often as event flag in the script.
|
Script is Green so you know it's script.
Kicker Functions:
A Kicker can:
Kicker1.DestroyBall - Destroys the Ball
Kicker1.CreateBall - Creates A Ball
Kicker1.Kick
Sub kicker1_hit()
Kicker1.Kick 0,10
end sub
The first parameter is direction, with 0 being due north.
The second parameter is 10 which is the strength of kick.
The angles are 0 to 359 technically though negatives appear to work as well.
Think of the directions as a clock face that goes
-------------- 0
---------305-------45
--------270---------90
---------225-------135
--------------180
For the direction you want to kick it. See Faq for more
on Kickers
Editor - Learn the Basics of the Visual Pinball Editor. Menu Bar Functions - Importing Images & Sounds.
Table Options - Ball Color - This explains Table options, importing a ball image & Changing ball color.
Right Click Options - Explains All Right Clicking Options for All Objects.
Building a simple Sling Shot - Learn how to make a slingshot from scratch using a basic wall.
Decals - Explains Decal Options, & shows how to import an image for a decal. Pinball DemoDecal
Plungers & Kickers - How to use a Plungers & Kickers & a Simple Pinball Demo.
Walls & Targets - Explains Walls & Targets. Pinball Demo1
Lights Collections - Learn how to use lights in a collection using collection manager. Pinball DemoLights
Lights & Bumpers - Learning Light & Bumper States & Lights, Bumpers Option Bar. Pinball Demo2
Gate & Sound Events - Explains Gate options & how to use sound events in keyup & keydown. Pinball Demo2.
TextBox & Making Score count - Shows you how to use TextBoxes & AddScore & Dim Score. Pinball Demo3.
Ramps - Explains Ramp Options & shows you how to build a simple Ramp. Pinball Demo4
Spinners - Explains Spinner Options & shows script to make a spinner work. Pinball Demo4
Triggers - Explains Trigger Options & shows script to make a Trigger work. Pinball Demo5
Timers - Explains Timer Options & shows script to make a Timer work. Pinball Demo6
Flippers - Explains Flipper Options & shows script to make a Flipper work. Pinball Demo7
EMReel - Shows you how to use EMReels. Pinball Demo8