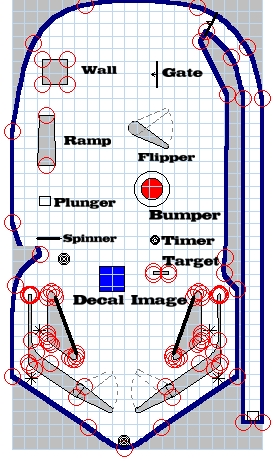
Editor Objects
Flipper
Flipper
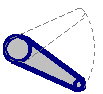
Flippers are used to hit the ball. (In case you didn't know :) )
![]()
Flipper Button
 |
|
|
 |
| First Lets Create a Flipper:If you don't have a table already opened File / New to open a new Table. | Click on the Flipper button | Move Cursor towards the table you are building. it should turn into a Flipper cursor, click this where you would like your Flipper placed. | and you get a Flipper. |
Now that we have a Flipper Created we can look at the Flipper Option Properties.
|
|
|
| Click on options in the ToolBar | and select the Flipper by clicking on it. |
Doing this will show us the Flipper properties.
Note:All new Tables come with 2 Flippers already on them. LeftFlipper & RightFlipper
|
Rubber Thickness
Left Flipper set to 7 Right Flipper set to 1
|
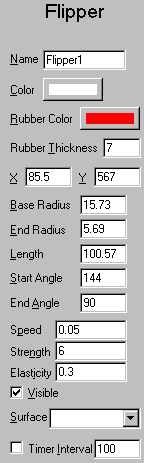
Flipper - Name for type of object you have selected. Name- Flipper1 The name of the Flipper, you can
change this to whatever you want, but don't need to. Remember Flipper1
must be scripted for it to move. The name is used to address the object
through the script. Color - Select the color of the Flipper. Rubber Color - Select the color of the Flipper's Rubber. Rubber Thickness - Select The Rubbers Thickness. 0 is Default. See Picture below Flipper Options Visible - Désactive l'existence du flipper . Par défaut coché (Attention cela ne permet pas de créer de flipper invisible.) Visible - Visible checked or unseen unchecked. Default is checked ------ Position X - Shows The X position of the Flipper on the table. Y - Shows The Y position of the Flipper on the table. Base Radius - The Thickness of the base of Flipper. Base of Flipper is usually made thicker. End Radius - The Thickness of the end of Flipper. End of Flipper is usually made thinner. Length - Changes the length of the Flipper.Start Angle - The Starting point for Flipper to begin moving from. See Angles below. End Angle - The Farthest point for the Flipper to move. See Angles below. Surface - Selects a surface for the Flipper to be placed on. ------ Physics Speed - The time it will take the Flipper to move from Start Angle to End Angle Strength - Determines how hard the Ball will be hit with the Flipper. Elasticity - Gives the object more bounce or Elasticity. Can be seen when ball will is reflected off the object. Making this number higher gives it more bounce. ------ Misc Timer Enabled - Unchecked is default. The Timer is off. He can be activated in the script and called by the procedure EMReelName_Timer() Timer Interval - Is the Time before the Timer procedure start. UserValue - This Variable is userdefined and can be use for wathever you want. I use it often as event flag in the script. |
Angles
0 being due north.
The angles are 0 to 359 technically though negatives appear to work as well.
Think of the directions as a clock face that goes
-------------- 0
---------305-------45
--------270---------90
---------225-------135
--------------180
Note: A easy way to change the flipper side is to add the negativ sign to value
Start Angle 120 goes Start Angle -120
End Angle60 goes End Angle -60
Flipper Script
Using demo7flipper.zip
| Flippers are pretty simple to get working. In the above example you can open it up & check the Flipper1 that was added in. The script for the Flipper1 is at the top part of the script in this demo. In the KeyCodes section of script. |
Note:The Green represents the part of the script from demo7, Only the Flipper1 script was added.
|
Sub Table1_KeyDown(ByVal keycode) If keycode = LeftFlipperKey Then Sub Table1_KeyUp(ByVal keycode) If keycode = LeftFlipperKey Then |
 |
Showing Flipper Options, for Flipper1
Notice the angles for getting it in this position, you may need to change them a few times on your own tables to get the to the exact position you want them in.
|
Editor - Learn the Basics of the Visual Pinball Editor. Menu Bar Functions - Importing Images & Sounds.
Table Options - Ball Color - This explains Table options, importing a ball image & Changing ball color.
Right Click Options - Explains All Right Clicking Options for All Objects.
Building a simple Sling Shot - Learn how to make a slingshot from scratch using a basic wall.
Decals - Explains Decal Options, & shows how to import an image for a decal. Pinball DemoDecal
Plungers & Kickers - How to use a Plungers & Kickers & a Simple Pinball Demo.
Walls & Targets - Explains Walls & Targets. Pinball Demo1
Lights Collections - Learn how to use lights in a collection using collection manager. Pinball DemoLights
Lights & Bumpers - Learning Light & Bumper States & Lights, Bumpers Option Bar.Pinball Demo2
Gate & Sound Events - Explains Gate options & how to use sound events in keyup & keydown.Pinball Demo2
TextBox & Making Score count - Shows you how to use TextBoxes & AddScore & Dim Score. Pinball Demo3
Ramps - Explains Ramp Options & shows you how to build a simple Ramp. Pinball Demo4
Spinners - Explains Spinner Options & shows script to make a spinner work. Pinball Demo4
Triggers - Explains Trigger Options & shows script to make a Trigger work. Pinball Demo5
Timers - Explains Timer Options & shows script to make a Timer work. Pinball Demo6
Flippers - Explains Flipper Options & shows script to make a Flipper work. Pinball Demo7
EMReel - Shows you how to use EMReels. Pinball Demo8


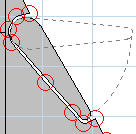 I edited the wall
to make the flipper spot look more realistic by right clicking the wall
behind Flipper & adding points & moving them.
I edited the wall
to make the flipper spot look more realistic by right clicking the wall
behind Flipper & adding points & moving them.