Right Clicking
Gate, Decal, Flipper, Spinner, Timer, Bumper, Kicker, Plunger, TextBox, EMReel

All Have 3 options to choose from when you right click on them.
Right Clicking
Gate, Decal, Flipper, Spinner, Timer, Bumper, Kicker, Plunger, TextBox, EMReel
All Have 3 options to choose from when you right click on them.

Lets go over Draw in Back First.
 |
 |
|
|
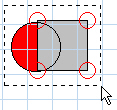
Lets say we added a light 1st to the table & then a wall over the light.Like This,and these are the spots that we want the objects in. but the wall is in the way to edit the light. |
So we need to select the wall & right click on it & select the option Draw in Back now the light is in front of the wall.
|
So now we are done with our light & want to edit the wall. select the Wall & right click on it & select the option Draw in Front. now the wall is Back in front of the light. |
Only the view is changing but not the vertical position.
Lock
Lock is for Locking the objects to a table, It locks them in place, so you don't have to worry about accidentally moving them.
 |
 |
|
 |
|
Lets say we wanted to lock the light & wall we were just editing. click & drag the mouse over both items. |
while they are hilighted | right click the mouse over them. & select Lock from the options. |
now the are both Locked.
|
If you need to unlock them follow the same steps & select Lock again. It will have a check by it showing they are locked.
Ramp, Wall, Target, TriggerCustom, TriggerCircle, LightCustom, LightCircle


All Have 9 options to choose from when you right click on them. 3 we already covered.
Note: Trigger ShapeCircle & Light ShapeCircle have no Add Point right click options.

Flip X
Using a triangle to show this. Click on the triangle to hilight it.
 |
 |
|
Select The Triangle & Right click over the Triangle
& select Flip X
|
and this is what you get. It Flipped The X Coordinates.
|
Flip Y
|
|
 |
|
Using a triangle again to show this. Click on the triangle
to hilight it.Right click over the Triangle & select Flip Y
|
and this is what you get. It Flipped The Y Coordinates.
|
Rotate - Used to rotate objects
|
|
 |
 |
|
Using a triangle again to show this. Click on the triangle
to hilight it.
|
Right click over the Triangle & select Rotate
where the 0 is enter 180. Center X & Y are showing the location of the triangle on the table. And the center for rotation. |
and this is what you get. It Rotated The
Triangle 180 Degrees.
|
Note:
Scale - used to resize objects
|
|
 |
 |
|
Using a triangle again to show this. Click on the triangle to hilight it. |
Right click over the Triangle & select Scale. It will open the Scale box. In Scale X where the 1 is enter 2 & then click ok.
Note:Center X & Y are showing the location of the triangle on the table.
|
And you get a triangle Twice as big.
|
Square Scaling Unchecked
|
|
 |
 |
|
Using the triangle thats twice as big to show this. Click on the triangle to hilight it.Right click over the Triangle & select Scale. It will open the Scale box. |
Take the check out of Square Scaling .. Enter .5 for Scale X & Enter 1 for Note:Center X & Y are showing the location of the triangle on the table. |
.5 was half & 1 was the same.
|
Translate - used to move objects
|
|
|
|
|
Using a triangle again to show this. Click on the triangle to hilight it. Right click over the Triangle & select Translate. It will open the Translate box. |
Select 50 in Offset X Grid Size was set to 50 in Table Options. so it moved 1 whole grid square. X - Left & Right Y - Up & Down
|
It moved it 50 Units on the grid to the right.
|
e:
Add Point - used to add editing Points to objects for changing shapes.
|
|
 |
 |
 |
|
Using a triangle again to show this. Click on the triangle to hilight it.Right click over the Triangle & select Add Point . |
Right click closer to the spot you want a Point. A point was added to the Left Center of the Triangle. |
Select The point by left clicking on it & holding.
|
& drag it with the mouse & let go of button
when its at the spot you want it.
|
N
Editor - Learn the Basics of the Visual Pinball Editor. Menu Bar Functions - Importing Images & Sounds.
Table Options - Ball Color - This explains Table options, importing a ball image & Changing ball color.
Right Click Options - Explains All Right Clicking Options for All Objects.
Building a simple Sling Shot - Learn how to make a slingshot from scratch using a basic wall.
Decals - Explains Decal Options, & shows how to import an image for a decal. Pinball DemoDecal
Plungers & Kickers - How to use a Plungers & Kickers & a Simple Pinball Demo.
Walls & Targets - Explains Walls & Targets. Pinball Demo1
Lights Collections - Learn how to use lights in a collection using collection manager. Pinball DemoLights
Lights & Bumpers - Learning Light & Bumper States & Lights, Bumpers Option Bar. Pinball Demo2
Gate & Sound Events - Explains Gate options & how to use sound events in keyup & keydown. Pinball Demo2
TextBox & Making Score count - Shows you how to use TextBoxes & AddScore & Dim Score. Pinball Demo3
Ramps - Explains Ramp Options & shows you how to build a simple Ramp. Pinball Demo4
Spinners - Explains Spinner Options & shows script to make a spinner work. Pinball Demo4
Triggers - Explains Trigger Options & shows script to make a Trigger work. Pinball Demo5
Timers - Explains Timer Options & shows script to make a Timer work. Pinball Demo6
Flippers - Explains Flipper Options & shows script to make a Flipper work. Pinball Demo7
EMReel - Shows you how to use EMReels. Pinball Demo8
